

Sonntag, 28. Dezember 2014
Mirkwood is marching into Battle
Some of GW´s new armoured Mirkwood-Elves...Stay tuned for some BofA-Pictures after new year ;)

Dienstag, 25. November 2014
Scouring of the Shire!
Here is some of my recent work. I finished a few more Hobbits for my project and built another Hobbithouse.


Lobelia leading the resistance
Mittwoch, 22. Oktober 2014


Sonntag, 12. Oktober 2014
Tales from the Shire
The results of Marc and Daniels great hobby weekend in Paris! Hope you guys like it! More stuff coming.


Mittwoch, 30. Juli 2014

Montag, 31. März 2014


Montag, 3. März 2014
the Riders of Rohan and a hello to everyone!
To adjoin the last post:

Here I am!
I feel very proud to be allowed to join
Jomada, I was a fan since the beginnings, so I´m very happy to have
the chance to show you some of my miniatures.
But without too much words, here is a
picture of my last few hours of work, the Riders of Rohan ;)
So, um gleich an den letzten Post
anzuschließen:
Hier bin ich also!
Ich fühle mich sehr geehrt an Jomada
mitwirken zu dürfen, ich war wirklich ein Fan der ersten Stunde
damals, umso glücklicher bin ich also, selbst ein paar Minis hier
posten zu dürfen.
Aber ohne zu viele Worte zu verlieren
hier gleich mal mein erstes Bild, die Reiter von Rohan haben mich vor
kurzem gepackt ;)
Hope you enjoy it,
Lucas
Sonntag, 2. März 2014
New crew member and FaceBook page!
For presenting more and especially more versatile projects in future we decided to expand our crew by one new member: Lucas! I'm looking forward to your miniatures!
Additionally we expanded Jomada and created a FaceBook Fan-Page. From now on you can also await, like and share our posts on FB!
https://www.facebook.com/jomadaadventures
HVM
Um euch in Zukunft noch mehr und vor allem vielseitigere Projekte zu präsentieren haben wir uns entschieden unser Team um ein neues Mitglied zu erweitern: Lucas! Freue mich schon sehr auf deine Miniaturen!
Des weiteren haben wir Jomada etwas expandiert und eine FaceBook Fanseite gestaltet. Ab sofort könnt ihr also auch dort unsere Beiträge erwarten, liken und teilen ;-)
https://www.facebook.com/jomadaadventures
HVM
Additionally we expanded Jomada and created a FaceBook Fan-Page. From now on you can also await, like and share our posts on FB!
https://www.facebook.com/jomadaadventures
HVM
Um euch in Zukunft noch mehr und vor allem vielseitigere Projekte zu präsentieren haben wir uns entschieden unser Team um ein neues Mitglied zu erweitern: Lucas! Freue mich schon sehr auf deine Miniaturen!
Des weiteren haben wir Jomada etwas expandiert und eine FaceBook Fanseite gestaltet. Ab sofort könnt ihr also auch dort unsere Beiträge erwarten, liken und teilen ;-)
https://www.facebook.com/jomadaadventures
HVM
Donnerstag, 30. Januar 2014

Mittwoch, 11. Dezember 2013
The Jomada Booth at Szenario 2014
The Jomada
Team will not only attend Szenario 2014 but will of course offer some handy little
workshop as well.

Das Jomada Team wird selbstverständlich nicht nur am Szenario 2014 teilnehmen, sondern wird dort natürlich auch einen kleinen Workshop anbieten.
Jomada’s
Miniature Accident and Emergency Unit
(Painting and Photography Workshop)
You have some
WIP miniatures that didn’t turn out as anticipated? You never get these blood
effects to look the way they should? You have started a conversion but can’t
get a decent result with Green Stuff. Painting eyes gives you the creeps? Your painting is fine but you can't figure out how to get a decent photo of your miniatures?
Our MA&E
Unit will help!
We’ll bring
our equipment and share our ideas and techniques with you. We believe in the
philosophy of learning-by-doing and will guide you to do this stuff yourself. We
could tell you what we would do if we were you but actually it’s the best thing if you directly practice a
technique yourself.
Requirements:
- Painting Workshop: Just bring the miniature(s) you need some help with. Miniature should be at least
primed. Although not mandatory, please bring your own tools, especially brushes and maybe
the most important colours (if the miniature is part of an army with a certain
colour scheme), if possible. We'll bring our stuff as well but it might help you to work with the tools you're used to.
- Photography-Workshop: Nothing needed, HvM will bring his photo backgrounds and will introduce you to his wizardry. Own miniatures and cameras are of course welcome.
Costs:
None,
but Hobbits are always thirsty and would never refuse a cold beer.
Jomadas Miniaturen-Notaufnahme
(Bemal- und Photo-Workshop)
Ihr habt da ein paar WIP Minis die nicht so geworden sind, wie ihr euch das vorgestellt habt? Blut-Effekte sehen bei euch nie so aus wie sie sollen? Ihr habt eine Umbau-Arbeit begonnen, scheitert nun aber am Modellieren mit Green Stuff? Augen zu bemalen lässt euch kalte Schauer über den Rücken laufen? Bemalen ist kein Problem aber ihr bekommt einfach keine gescheiten Photos von euren Minis hin?
Unsere Miniaturen-Notaufnahme schafft Abhilfe!
Wir bringen zum Szenario unsere Ausrüstung mit und stehen jederzeit bereit unsere Ideen und Techniken mit euch zu teilen. Gemäß des Grundsatzes "Versuch macht klug" möchten wir euch dabei helfen Probleme selbstständig zu meistern. Wir könnten euch natürlich auch einfach sagen was wir tun würden, wenn wir an eurer Stelle wären, aber am besten ist es immer noch, wenn ihr die Techniken direkt vor Ort mit uns ausprobiert und die Resultate direkt mit nach Hause nehmen könnt.
Vorraussetzungen:
- Mal-Workshop: Bringt die Figur(-en) mit, bei denen ihr Hilfe braucht. Diese sollten zumindest grundiert sein, damit wir direkt starten können. Es wäre zudem großartig, wenn ihr euer eigenes Werkzeug, insbesondere eigene Pinsel, mitbringt. Eventuell sind auch eure wichtigsten Farben von Vorteil, falls ihr ein spezielles Farbschema wünscht. Dies ist nicht zwingend, kann aber eine Hilfe für euch sein, da ihr mit eurem eigenen Material im Zweifel besser vertraut seid.
- Photo-Workshop: Keine. HvM bringt seine Foto Hintergründe mit und gibt ein bisschen was von seinen Zaubertricks preis. Eigene Figuren und eigenes Kamera-Equipment sind natürlich gerne gesehen.
Kosten:
Keine. Hobbits würden allerdings niemals ein kühles Blondes ablehnen.
Sonntag, 8. Dezember 2013
Into the Mirkwood...
We really enjoyed painting a couple of miniatures of the new Hobbit release!
Can't wait to see the movie next week!
Thranduil by MarcK
Palace Guards by HVM


Can't wait to see the movie next week!
Thranduil by MarcK
Palace Guards by HVM


Mittwoch, 27. November 2013
Orcs!
I finished my 4pt warband for SAGA. At least it contains two units of warriors, two units of hearth guards (1x mounted) and the warlord.
The warband includes mostly the old metal Mordor Orcs by GW. Because i like the wargs of the Hobbit range more than the old metal ones, i used them as the only plastic miniatures in that army.
Meine vier Punkte Armee für SAGA ist fertig geworden. Letztendlich besteht sie aus zwei Einheiten Kriegern, zwei Einheiten Hearthguards (1x beritten) und dem Warlord.
Die Armee besteht größtenteils aus den alten GW Mordor Orks aus Zinn. Da mir die Warge aus dem Hobbit Sortiment allerdings besser gefallen, bilden diese die einzigen Plastik-Minis der Armee.


The warband includes mostly the old metal Mordor Orcs by GW. Because i like the wargs of the Hobbit range more than the old metal ones, i used them as the only plastic miniatures in that army.
Meine vier Punkte Armee für SAGA ist fertig geworden. Letztendlich besteht sie aus zwei Einheiten Kriegern, zwei Einheiten Hearthguards (1x beritten) und dem Warlord.
Die Armee besteht größtenteils aus den alten GW Mordor Orks aus Zinn. Da mir die Warge aus dem Hobbit Sortiment allerdings besser gefallen, bilden diese die einzigen Plastik-Minis der Armee.


Montag, 4. November 2013
Trolls & Company Photo Updates
Hi folks!
At first I have to apologize because I haven't any new miniatures to show you. But since I figured out how to get halfway cool and more realistic looking photographs of my miniatures, I am really kneen on that techniques. So I reshooted the dwarvish company and the three trolls. Hope you like the new pictures!
HvM
Hi Leute!
Als erstes muss ich mich entschudigen, dass ich euch leider keine neuen Miniaturen zeigen kann. Aber seitdem ich rausbekommen habe, wie ich einigermaßen coole und realistischere Fotos von meinen Minis mache, bin ich von dieser Technik sehr angetan. Deswegen habe ich nochmal die Zwerge und die drei Trolle neu fotografiert. Ich hoffe die Fotos gefallen euch!
HvM


At first I have to apologize because I haven't any new miniatures to show you. But since I figured out how to get halfway cool and more realistic looking photographs of my miniatures, I am really kneen on that techniques. So I reshooted the dwarvish company and the three trolls. Hope you like the new pictures!
HvM
Hi Leute!
Als erstes muss ich mich entschudigen, dass ich euch leider keine neuen Miniaturen zeigen kann. Aber seitdem ich rausbekommen habe, wie ich einigermaßen coole und realistischere Fotos von meinen Minis mache, bin ich von dieser Technik sehr angetan. Deswegen habe ich nochmal die Zwerge und die drei Trolle neu fotografiert. Ich hoffe die Fotos gefallen euch!
HvM


Freitag, 27. September 2013
Tutorial: Easy snow bases/Schneebases
Snow themed miniatures and bases are amongst my favorite of all the different ways of 'decorating' the bases of wargaming miniatures. Unfortunately, the very realistic techniques are often not very suitable for gaming, as the effect is often very fragile. I've experimented with many different products such as baking soda, but also 'snow effects' from various manufactures. Most of the ready-made products were absolutely unrealistic and rather expensive for the crappy results they offered. On the other hand, bicarbonate of soda turned yellow after some months...
I recently stumbled upon a great product, which looks absolutely stunning, is easy to use and wont change its colour: PK-Model-Snow-Powder ! I bought two pots of the stuff, because I plan some big winter themed projects for the future, but I think you could easily base an entire army with just one pot.
The other key element to my way of creating snowy bases, which in my opinion gives great results, is Vallejo Still Water effect. In combination with the snow effect this gives a great finish. But more of this later!
I decided to do a step-by-step tutorial, showing how I painted the base, the material I used for the vegetation as well as a detailled description of the snow effect itself.
Zum ersten Mal jetzt auch auf Deutsch auf diesem Blog, da wir ja jetzt direkt zur Hauptseite verlinkt sind und uns die deutschsprachige HDR-Community näher ist.
In diesem Artikel versuche ich kurz meine Methode möglichst schönen und realistischen Schnee für die Bases von Tabletop-Figuren darzustellen, zu erklären! Es gibt viele verschiedene Methoden und fertige Produkte von diversen Herstellern, mit denen ich bisher leider nicht zufrieden war...entweder, weil der Effekt am Ende einfach unrealistisch ausgesehen hat (Kokosraspel ;) ) oder sich das Material mit der Zeit verfärbt hat (Kaisernatron). Ich habe ein Produkt entdeckt, das mir persönlich sehr gut gefällt und sehr überzeugende Resultate liefert: PK-Modell-Schnee-Pulver (der Onlineshop ist insgesamt einfach unglaublich-lauter Topmaterial und auch toller Service!). Zusätzlich dazu verwende ich Vallejo Still Water um den Schnee auf die Bases aufzubringen. Ich werde Schritt für Schritt auf die Bemalung, die Begrünung, sowie aufs Anbringen des Schnee-effektes eingehen!
The base was decorated with a few pieces of slate and afterwards sand was glued on. The entire base was sprayed black.
Die Base wurde mit ein paar Schieferstückchen gestaltet und danach klassisch besandet und schwarz grundiert.
The entire base was then heavily drybrushed with Dryad Bark, followed by a slightly lighter drybrush of Baneblade Brown. The rocks were drybrushed with Mechanicus Standard Grey, followed by Neutral Grey (VMC)
Die Base wurde komplett (also auch die Felsen) mit Dryad Bark trockengebürstet und mit Baneblade Brown aufgehellt. Die Felsen wurden anschliessend mit Mechanicus Standard Grey und Neutral Grey (VMC) gebürstet.

Then, the entire base was drybrushed with Iraqi Sand (VMC), followed by a very subtle drybrushing of plain white.Finally the rim of the base was painted with German Grey (VMC) to give it a nice and clean finish.
Die Base wurde komplett mit Iraqi Sand (VMC) trockengebürstet und die hellsten Akzente wurden mit sehr wenig reinem Weiss "gemalt". Hier gibt es eine "Theorie", dass man Felsen nie mit reinem Weiss bürsten soll, um ein möglichst realistisches Resultat zu erhalten, ich kann dies jedoch nicht nachvollziehen.
Am Schluss wurde der Rand mit German Grey bemalt (VMC) um das Gesamtbild abzurunden.

Vegetation is mainly Mininatur grasstufts, especially "early fall" and "late fall", aswell as fine turf by Woodland scenics (Burnt Grass and Earth). I added the fine turf in a few successive layers, using watered down PVA and an old brush. This gives a more realistic appearance of the moss.
Ich habe Gras- und Karstbüschel von Mininatur (Frühherbst und Spätherbst), sowie Fine Turf von Woodland Scenics verwendet um die Base zu begrünen. Hierbei wurde das Fine Turf in mehreren Schichten aufgetragen um ein möglichst realistisches Ergebniss zu erhalten. Ich habe hierfür verdünnten Holzleim verwendet.

Finally to the snow! I mix the snow-powder with a few drops of Vallejo still water. The quantity of still water used determines how your snow looks like afterwards. If you use a lot, it will look like melting mushy snow, whereas a rather "dry" paste will give you a fresher looking snow. The paste will adhere quite well to the base using only the wather effects mixed in with the snow. If however it doesn't really stick, apply a bit of still water onto the base and then add the paste. I use an old brush for this, as it gives nice random patches of snow. After the snow is applied onto the base, I often apply little drops of still water onto the patches of snow and sprinkle them with the snowpowder. The snow will stay nice and glossy after drying, which in my opinion is one of the big advantages of this technique!
Schlussendlich zum Schnee an sich. Ich vermische das Schneepulver mit Vallejo Still water um eine Paste zu erhalten, die ich dann mit einem alten Pinsel auftrage. Durch den Pinsel wird der Schnee in zufälligen Formen aufgetragen, was sehr zum Realismus beiträgt. Je nachdem wieviel Still water man hinzufügt sieht der Schnee entweder frischer (weniger Stillwater) oder matschiger (viel still water) aus. Normalerweise klebt die Pampe ziemlich gut am Base fest, wenn nicht trage ich eine dünne Schicht Stillwater direkt aufs Base auf und setze dann die Schneepampe oben drauf. Der Schnee bleibt auch nach dem Trocken sehr schön glänzend und wirkt leicht durchsichtig.


The final result:


I hope you like his tutorial and maybe give it a try! If you have any questions, feel free to post them in the comment section. It would be great if you could tell me if this technique worked for you or not!
Ich hoffe euch gefällt das Tutorial und ich habe alle Schritte verständlich erklärt. Wenn nicht, bzw wenn noch irgendwelche Fragen offen bleiben, könnt ihr gerne hier schreiben oder mir im Forum Feedback geben! Ich würde mich auch sehr über Erfahrungsberichte freuen, sollte sich der ein oder andere dazu entscheiden diese Technik mal auszuprobieren!
Donnerstag, 12. September 2013
Do you know how the Orcs first came into being? They were Elves once. Taken by the Dark Powers. Tortured, and mutilated. A ruined and terrible form of life. And now... perfected. My fighting Uruk-hai.
I haven't posted much since the beginning of this blog, so it's about time now to show a bit of my work! These Uruk-Hai were originally destined for the Lord of the Rings Strategy Battle Game, but after having been introduced by fellow hobbyists to SAGA ( which can be played with LOTR battleboars available here: http://tabletopdeutschland.wordpress.com/category/fantasy/der-herr-der-ringe/) I think I'm rather going to use them for this system. They still have the 'classical' 25mm bases, typical of GW. I am however going to stick with the trend of flat basing that is becoming more and more popular in the german LOTR tabletop scene. I tried some atmospheric shots, rather than showcase, I find that this style ( used by painters such as Frank Becker, 'Tankred' and my fellow blogger HvM) fits the LOTR miniatures particularly well!


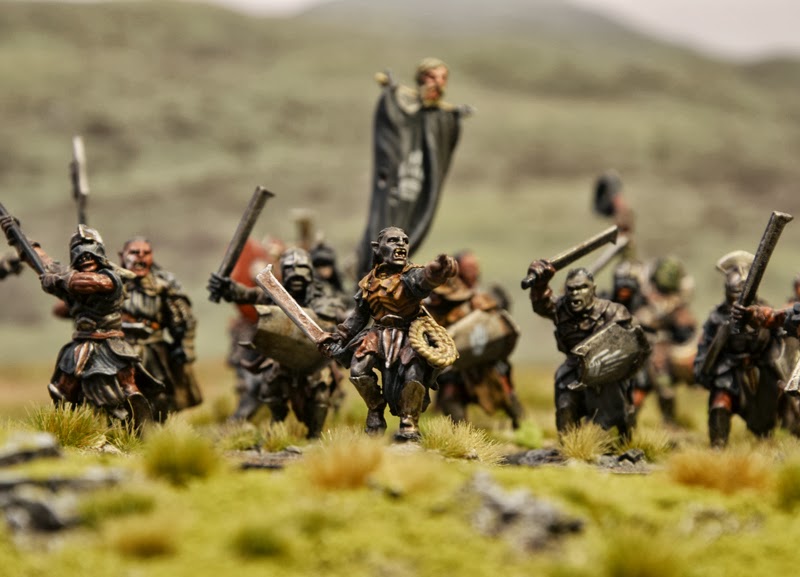

As it can be seen of some of the pictures, I converted a lot of miniatures to create new poses but also new characters.
I hope you like it-feel free to leave feedback!
Montag, 12. August 2013


Montag, 29. Juli 2013


Samstag, 4. Mai 2013
Unboxing: Radagast the Brown on Sleigh
After seeing the pictures of this new release for the Hobbit range, I was very excited and decided to get this set, which in my opinion counts among the best miniatures that have been realeased for the Hobbit up to date. In this article, I'm going to get a closer look of the contents of this box and say a few words about the quality of the kit, which is as most will know in Finecast.

After opening the cardboard box, you'll find a plastic box (which is usual with these kind of sets) containing all the different pieces needed to assemble the miniature, aswell as a large base (more words on that later!).


There was a lot of speculation about the base on the forums. On the official pictures it was impossible to see the real size of this base, and due to its shape, some assumed that Radagast's sleigh would come on the Mumakil base, which is extremely large. In fact, this base is the same size as the dragon's base (thanks River Zora over on one-ring.co.uk). I took a picture with a regular 25mm and a 40mm cavalry base as comparison. The ruler will give you the exact length/scale. Even if it is smaller than the mumakil base, there is a lot of space for the eager hobbyist to create a nice scenic base (e.g. a forest base).


The pictures above show a more detailled view of some of the sprues contained in the box! In general the quality of the cast is good, I found a few issues (mostly airbubbles) on Radagast (especially the nose an the hat unfortunately)
and the rabbits. This certainly can be repaired with some Liquid
greenstuff or milliput juice, but it's still kinda annoying. Also there
is general mould lines and flash, which can easily be removed with a
sharp hobby knife and some small grain sandpaper. As stated above, there
where no deformations or major faults. However, I find that the sculpt
is not as good as it could have been...compared to Radagast and
Sebastian released earlier this year, the sculpt lacks detail,
especially in the face. While on the foot version the actor's facial
features were greatly reproduced, on this version the face seems to lack
detail in general. Some of the rabbits look like they were sculpted in a
rush. Apart from this, this really is a good miniature, but it takes
some skill, a lot of patience and a very sharp knife to assemble this
kit. Due to the fragility of finecast, the different parts should be
handled with care, because some parts ( the sleigh in particular) are
very thin and therefore difficult to repair if anything should break of.
Despite the minor flaws and the rather complex assembly, this is a miniature I'm really looking forward to painting. I will publish further articles concerning assembly&painting!
I hope this review will be helpful for people who are not decided yet wether or not to get this miniature.
Marc
Abonnieren
Posts (Atom)